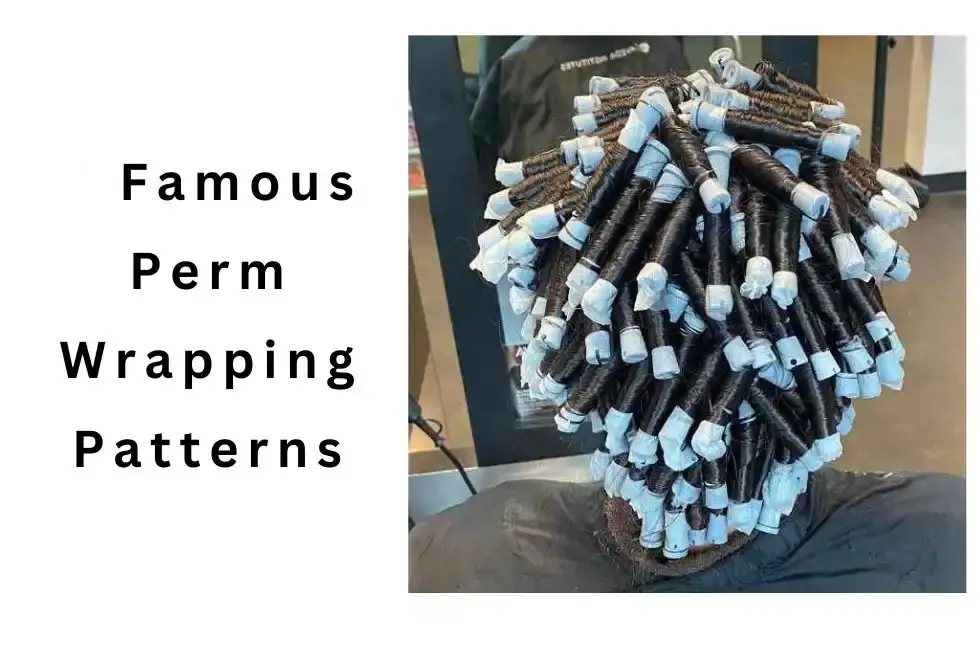
11 Famous Perm Wrapping Patterns & Techniques (For 2023)
The pattern you wrap your hair around the perm rods decides how the curls will finally look. There are many perm wrapping patterns to choose between the one look that will suit your hair the best.
Hairstylist experiment with different tools and techniques to create diverse perm looks. For example, in a basic perm, you will get loose or tight curls depending on the diameter of the perm rods.
However, with the evolution of hair perm, there are over 50 perm looks to say hello to your future curls. All of these looks are created using different perm-wrapping patterns.
While some of these perm patterns get you a voluminous hair look, others are good at producing tighter curls or ringlets. You may even get your personalized hairstyle by putting your hair on the perm rods in any unique style.
Below, I have put together some of the most famous and fantastic perm wrapping patterns of the modern day. So, Let’s explore each of them!
Unique Perm Wrapping Patterns To Get You Perfect Curls
Combining the different wrapping techniques helps you pull off natural-looking perms that add volume to your manes. In the following, I have discussed the most famous perm wrapping patterns.
1. Piggyback Hair Perm Wrapping
The piggyback perm rolling pattern is ideal for creating natural-looking curls on mid to long-length hair.
This perm wrap technique employs two perm rods for each subsection of the hair strands.
You will roll the smaller rod from the mid-length of your sub-sectioned hair down to the roots. It does not require the endpaper.
While wrapping your hair down from the mid-length, you must ensure the hair left above remains untangled.
Do you know why this wrapping technique is called piggyback? The smaller perm rod carries the larger rod on its back.
Once you have rolled your hair around the smaller perm rod, now is time to wrap the remaining hair.
First, use the perm paper to wrap your hair ends and then roll them down to already rolled manes on the larger perm rod.
In the next heading, I have embedded a youtube video that will further help you master piggyback and windmill perm wrap patterns.
2. Windmill Perm Wrap Technique
The windmill perm wrapping pattern is an excellent alternative to the piggyback wrap technique.
Once you have sectioned your hair, wrap the perm paper around your hair ends and start rolling hair around the perm rod.
When halfway through your sectioned hair length, place the band or strap over the perm rod and stop wrapping.
Take the new perm rod, and place it a few centimetres down the first with no endpapers. Hold the first perm rod and give it a single swirl around the second one.
As a result, you will have both perm rods in a shape of a windmill. Move them down to the hair roots like windmill wheels while wrapping your hair.
3. Savage Perm Wrapping Pattern
The savage perm wrapping pattern is also similar to the piggyback technique. It also employs two different perm rod sizes on each hair subsection.
However, there are a few exceptions!
You will need two different diameters and sizes of rods.
Start wrapping your hair from mid-length down to the roots on a bigger diameter and smaller length rods. You will not need endpaper for this step.
To roll the hair above mid-length, choose a smaller diameter rod than the earlier one and roll your hair from the ends to the already wrapped manes in a spiral pattern.
Plus, you will need perm paper for this step!
Combining these two perm-wrapping techniques creates a more natural curly look with a mix of different curl sizes.
4. Braided Hair Perm
Did you know that you can perm over braids to create bouncy and textured hairstyles? French braid perm is in trend nowadays.
Using this technique, you can get tight or loose curls with a perm kit where you don’t need to employ perm rods.
The whole procedure of braid perm is almost the same as a conventional perm.
The challenging part is braiding your hair correctly to produce ringlets or waves.
If you have experience getting yourself any braid, this perming technique can do a miracle for your locks.
Once you have decided which shape and size of curls you want, you will need to look out for a braid pattern that you can employ instead of perm rods.
There are plenty of different braiding pattern tutorials available on youtube. You can learn any and give your braid-like curls with a perm kit.
5. Piston Perm Wrapping Technique
The piston perm wrap method is an effective way to add volume and texture to your hair. This technique results in bouncy, textured curls with plenty of movement and body.
Piston curls get their name from the process of wrapping hair around rods in an up-and-down motion, creating curls that point in various directions.
The alternating wrap direction creates a mix of curl sizes and shapes for a naturally tousled, beachy style.
Below is a step-by-step guide on how to wrap your hair using the piston pattern:
- Section clean, towel-dried hair into four sections. Work on one section at a time.
- Take a 1-inch wide subsection and place the end on the perm rod.
- Wrap hair around the rod in a clockwise direction to the scalp.
- At the halfway point, reverse direction and wrap hair counterclockwise to the scalp.
- Alternate wrapping clockwise and counterclockwise to the end of the subsection.
- Secure the hair tightly to the rod with end papers.
- Repeat the process with all sections, alternating wrap direction with each rod.
- Process rods according to perm solution instructions.
6. Stacked Perm Pattern
Stacked perm wraps create amazing bouncy curls that fall perfectly into place, giving you a defined pile of gorgeous ringlets with tons of body. Trust me; it’s worth trying out this look!
It’s called stacked because strands are wrapped vertically in different directions, stacking the curls on each other.
The wrap direction is alternated to build up curl formation and allow curls to mesh together.
Here is a step-by-step procedure for wrapping hair in a stacked pattern:
- Section clean, towel-dried hair into four quadrants. Work on one section at a time.
- Take a 1-inch subsection and place the ends on the perm rod.
- Wrap the hair around the rod toward the scalp.
- When you reach the scalp, reverse direction and wrap the hair around the rod toward the ends.
- Continue wrapping vertically in alternating directions until you reach the end of the subsection.
- Secure the hair tightly on the rod with end papers.
- Repeat the process with all sections, alternating wrap direction with each rod.
7. Croquignole Spiral Perm
Croquignole means wrapping your hair around rods, starting from ends and moving inwards.
This perm-wrapping pattern is as simple as anyone asks. Firstly, you will start from the lower back of your head.
If your head has five parts, from the frontal hairline to the lower back, select the one part behind your head and section the hair into two parts vertically.
Divide them as if you are to braid these two sections.
Subsection hair into 6-8 parts and wrap them around regular perm rods.
Now for the remaining of your head, use flex rods for wrapping in the spiral fashion.
Wrap the hair in different directions to give the perm a natural look.
What do I mean by different directions?
While wrapping the hair on Flexi rods, you can roll the rods forward and reverse direction.
Think of holding the rod between your thumb and its adjacent finger, touching the tips of your thumbs with the fingers, and moving them downwards; it’s a forward way of rolling the perm rods.
Moving the fingers in from the base of your thumbs to the tips will be the reverse wrapping direction.
8. Gemini Perm Wrap Pattern
For a Gemini perm wrapping pattern, when you select the subsection of your hair to roll around the rods, further divide it into two parts before rolling.
Roll one part on a smaller diameter perm rod using the endpaper. Next, wrap the remaining part on a larger diameter perm rod.
Also, make sure you roll hair around the pair of rods in different directions.
The idea behind employing this technique is to create near to naturally curly hair look.
9. Bricklay Perm Rolling Technique
Bricklay pattern perm requires two different lengths of rods. If the larger one is 8 cm, the smaller one would be 5 cm or less. Moreover, it does not need the pre-sectioning of the hair that’s usual for other perm patterns.
For the first step, take the lengthier perm rod, and place it horizontally adjacent to your frontal hairline. Now select the section of hair the same as the length of the perm rod.
Lift the sectioned hair at the 90-degree angle straight over your head, comb it, and place double endpaper at the hair ends.
Wrap the selected section around the rod.
For the second step, you will need two smaller length rods that cumulatively equal the length of the first rod.
Select the section of hair just as you did in the first step with the larger perm rod. Divide it into two equal parts matching the length of two smaller perm rods.
Use single perm paper or its alternative to wrap the ends of these subsections and roll your hair around the smaller rods.
Repeat both steps for the remaining hair.
10. Vintage Perm Pattern
A vintage glam perm pattern is an excellent way to create soft romantic waves on your naturally straight hair.
You will need 10-15 Flexi rods or the usual perm stick with a 1.6 to 2.0 cm diameter.
Moreover, you will roll your hair on these perm rods in two directions, away and toward your face.
You won’t need to section your hair into equal parts. However, the sections should not be too varied from each other.
At the front of your head, you will wrap hair on the perm rods in a direction moving towards your face. For the back, you can do the contrary.
On the sides, you can do a mix of both directions.
11. Spiral Hair Wrapping Perm Pattern
You will need more perm rods than the usual perm for a spiral perm wrapping pattern.
Hair is sectioned as you will go through the pattern.
Select a section of hair and secure the remaining hair with a clip— further subsection your hair according to the perm rod size.
After wrapping the perm paper at the ends, roll the hair around the rods for one to two revolutions.
Once the hair ends are secure on the roller, wind the perm rods around your hair to give it a twisted shape.
This process is repeated throughout your hair. However, each new section will be rolled in the opposite direction as the first one is wrapped.
Wrapping Up
There are multiple perm wrapping patterns to choose between the one that will suit your hair the best. Above, I have explained a few of them. You can further search the pattern by its name on youtube to watch the video tutorials.